"Proxifier" is a proxy routing program available for Windows, Mac OS X, and Linux operating systems. This software has the ability to route the internet traffic of applications running on your computer through proxy servers. In this way, it can be used for various purposes such as providing privacy and anonymity in your internet access, bypassing internet censorship or redirecting network traffic.
You can follow the steps below to use Proxifier:
Step 1: Download and Install Proxifier Download and install Proxifier from the official website. Downloading is usually done using a simple installation wizard. The download and installation process may vary depending on your platform.
Step 2: Start Proxifier After the installation is complete, run Proxifier. When the program opens, the main window will be displayed.

Step 3: Add Proxy Servers Follow these steps to add proxy servers:
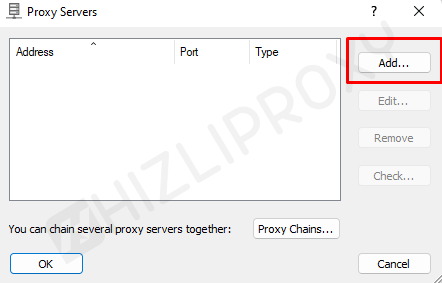
- In the main window of Proxifier, click on the "Profile" menu in the upper left corner and then select "Proxy Servers...".
- Click the "Add" button in the "Proxy Servers" window.
- In the "Add Proxy Server" window, enter a name in the "Proxy Name" field to specify the name or description of the proxy server (optional).
- In the "Address" field, enter the IP address or domain name of the proxy server.
- Enter the port number of the proxy server you will use in the "Port" field (usually numbers such as 8080, 3128 are used).
- If the proxy server requires a username and password, enter the required information in the "Authentication" section.
- After verifying the settings, add the proxy server by clicking the "OK" button.


Step 4: Create a Profile and Configure Proxy Settings To use proxies, you need to create a profile:
- In the main window, click on the "Profile" menu and select "Proxy Servers...".
- Click "Add" from the "Profile" menu.
- In the profile creation window, save the profile with a name (for example, "Proxy Usage") and click the "OK" button.
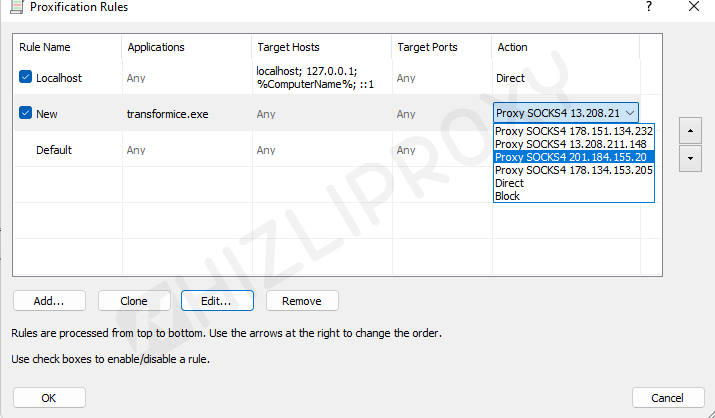
Step 5: Proxy Programs After creating a profile, you will need to identify the programs for which you want to use the proxy server:
- In the main window, click on the "Profile" menu and select the profile you created (for example, "Using Proxy").
- Then click on "Name Resolution" from the "Profile" menu and click "Resolve hostnames through proxy" seçeneğini işaretleyin.
- Now, the list of programs will appear. Select the programs you want to proxy by clicking the "Add" button. These programs will route internet traffic through a proxy.
Step 6: Save and Apply Settings After making all the proxy settings, click the "OK" button to save the changes and apply them.
Now the programs you selected will access the internet using the proxy server.